I have a not-so-secret secret. I love food! I like cooking and baking different things. The smells! The flavours! My mouth waters when just thinking about certain dishes. But even with my love of food I am no "foodie." I'm more of a wanna-be foodie I guess you could say, because I have to be honest.... IIII'm a picky eater. I do my best to try new things and when I'm eating out at a friends place or restaurant I force myself to eat as much as possible of the stuff I don't like. But as I make my own meals most of the time they tend to be lacking in particular fruits and veggies.
So I've recently decided to try and balance my diet out with the addition of smoothies. For some reason I've always liked smoothies, even if they had a fruit/veggie that I didn't care for. It's also helpful that you can have a smoothie at any point in the day. Great for breakfast, after lunch or supper. These are some of my favourites so far (click the title for original recipe!):
Peach Cobbler Smoothie
This one was very tasty! It's very refreshing and would taste even better in the summer time. Perfect afternoon snack or even as a desert. I found that the recipe makes kind of a large quantity so have someone to share it with (or just save it as a treat for later).
-2 cups vanilla yogurt (I only used about a cup and a half)
-1 teaspoon vanilla extract
-1 teaspoon honey
-1/3 teaspoon nutmeg
-2 teaspoons wheat germ
-4 teaspoons rolled oats
-2 cups frozen unsweetened peach slices
-8 ice cubes
Put all ingredients together in a blender and process for about a minute.
Peach Mango Green Smoothie
I've been skeptical about green smoothies for a while but this one is actually quite good. If you use a banana that's really ripe it gives it an extra taste of banana-y sweetness that's just awesomely delicious! Also, my blender had a tough time mixing this one up as its a pretty thick smoothie so just add more liquids to it if need be.
-1 cup milk (or soy/almond milk)
-1 banana (fresh or frozen)
-1 cup chopped mango
-1/2 cup frozen peach slices
-2 cups fresh spinach
-1/2 cup of ice (I used 4 or 5 small ice cubes because at this point I was running out of room in my blender)
Throw all the ingredients in the blender and blend till smooth!
Chocolate Banana Green Smoothie
Another green(-ish) smoothie that is deceptively delicious! I think this was probably my second attempt at trying a green smoothie and it worked out much better than the first. It's almost like a thin chocolate banana milkshake. Mmmmm!!
-1 to 2 bananas (frozen - helps make the smoothie a bit thicker)
-2 tbs Cocoa powder
-a cup or 2 of spinach
-1 cup milk (or soy/almond)
Blend away!
Strawberry Cream Smoothie
This has become one of my faaaaavourite smoothie recipes. I like to have it as a dessert because it tastes so much like a milkshake. Sweet, a little fruity, and creamy! Unfortunately I can't remember where I found this one so my apologies to the original source.
-1 frozen small to medium banana (again, make sure its nice and ripe)
-1 cup of frozen strawberries
-½ avocado
-1 ½ cups of milk (or soy/almond)
-1 tsp of vanilla extract
-1 tbsp maple syrup
Mix till nice and smooth and voi-la!
Tuesday, 5 November 2013
Thursday, 31 October 2013
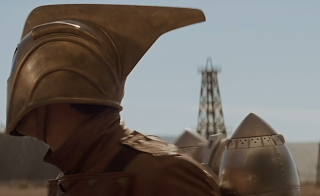
The Helmet!
Alllllllllllrighty then, onwards, to the pièce de résistance!! The Rocketeer's iconic helmet!

 I spent quite a bit of time brainstorming on this one. I had never constructed anything even remotely close to this level of prop making before. One of the first ideas I thought of was paper mache but decided against it for various reasons. Next idea I came across was to buy a motorcycle or paintball helmet, spray paint it gold and glue a cardboard fin on. I discounted this one because most of those helmets don't have the proper shape and I wanted to try and get something a little more accurate. Then I came across something called Pepakura (I believe I first found it through Youtube). Pepakura is a program dealing with paper craft. There's Pepakura Viewer and Pepakura Designer, they basically allow you to take a 3D object, break it up into 2D puzzle pieces that you can print off on some card stock, and then cut and paste together to re-create that original 3D object. AMAZING (and usually pretty accurate)!!


 Now, since I have no idea how to make a 3D model I had to find the file for it online. For the life of me I cannot remember the site I found it on (I spent a loooot of time Googling that one), however credit to roadwarrior for doing the 3D model and nintendude for unfolding it!! After finally discovering and downloading it I excitedly printed it off, spent a few hours cutting it all out and a few more hours gluing it all together again....and that's where I ran into my first problem. The helmet was huuuuuuuuggggeeee! No human head would ever fill that helmet. So, a little discouraged, I went to Youtube searching for some videos on how to scale things in Pepakura.
Unfortunately there doesn't seem to be a magical equation to solve all our scaling problems. The best advice I had (for scaling helmets anyways) is to make it fit the widest part of your head, so the width from ear to ear. After measuring (to the best of my ability) I put that measurement into Pepakura and printed it off again. This time it fit a heck of a lot better, I probably could have even gone a bit smaller but I didn't want to have to print it off and start it all over again for "a bit."

 After the Pepakura process it's time to resin and fiber glass it (another process I was completely unfamiliar with). Since I have never worked with either material before I spent a lot of time on Youtube and in forums looking up how to work with them and any safety precautions related to it....whhhiiiiiiich led me to buy a respirator. It may be about $50 but really, invest in a good respirator if you plan on working with these things!!! Your lungs will thank you.
 SO! After picking up some polyester resin (stiiiinky stuff) and cloth fiberglass from my local hardware store I set to work. The resin comes in two parts: the resin and a catalyst that hardens the resin as it dries. Only make small batches at a time because it goes quick. Following the directions, you mix about a 1/4 cup of resin with a few drops of hardener, give it a quick stir, and take a cheap brush (cuz you won't be getting it back!) and slosh it all over the outside of the card stock. After it had dried I hot glued a piece of foam board on for the fin of the helmet because it was the proper thickness. It ended up making it sturdy enough that i didn't really need to resin it....but I put a thin coat on it anyways. After it all dried I flipped it over, placed cut up squares of the fiberglass cloth on the inside and "glued" it on with more resin. When all that dries it becomes hard as a rock.


Before moving onto the next process you need to cut off any excess resined fiber glass. It's good to have some overhang with your fiberglass as it helps keep your build strong. I borrowed my boyfriends dremel tool and used it to cut off the excess fiberglass around the eye holes, the mouth piece, and the bottom sections and smooth out some of the inside of the helmet. Fiberglass can poke and pierce you if ya just leave it - and no one wants that!


 Next up is Bondo-ing it.You can pick it up at any hardware store or auto body shop. Again, it comes in two parts like the resin. A tub of liquidy clay looking stuff and a small tube of hardener. Before applying, its a good idea to lightly sand the resin on the outside a bit so the Bondo has a better surface to adhere to. After it's mixed up use a piece of cardboard or plastic to spread as thin a coat as you can over the surface of the helmet. This is A LOT harder to do than it looks!! My respect to those who work with this stuff for a living! Once its dry you sand...and there was lots and lots and lots of sanding. Then I did another layer and some more sanding. I would have liked to have put another layer of Bondo on, but was running out of time quickly so decided to do a patch job on the parts that just needed to be evened out most.


After all the sanding I still needed to do some detailing that the Pep file had left out (the lines on the sides and the little bolts around the eye holes). I used an epoxy putty/clay that when activated hardens in a few minutes and while it feels like a rock when dry you can actually sand it down. You can buy this stuff in tubs but the one that was most readily available to me (again, by this point I was running low on time) I got from Canadian Tire called Mighty Putty (as seen on TV!). I rolled it out thin and placed it all around the helmet. For the bolts I just rolled little balls of clay and stuck 'em on - fairly simple.

 Finishing touches! I started with a black primer spray paint as an undercoat and then finished it off with an antique gold. For the lenses I originally thought I was going to use those big clown glasses from the dollar store and just glue them in. But of course, when I need something I can never find it. So I ended up buying those cheesey over sized Elvis glasses (also from the dollar store) and then placed window tint film over top of it. They didn't fit perfectly but it was pretty good for a first try. After that I used a piece of leather from the purse I used for my rocket pack straps to make a chin strap (just hot glue it in).
And that was that. I popped it on and went to the con. Had some great reactions from those who knew the character. Lots of fun and a great learning experience. Can't wait for my next project!


 I spent quite a bit of time brainstorming on this one. I had never constructed anything even remotely close to this level of prop making before. One of the first ideas I thought of was paper mache but decided against it for various reasons. Next idea I came across was to buy a motorcycle or paintball helmet, spray paint it gold and glue a cardboard fin on. I discounted this one because most of those helmets don't have the proper shape and I wanted to try and get something a little more accurate. Then I came across something called Pepakura (I believe I first found it through Youtube). Pepakura is a program dealing with paper craft. There's Pepakura Viewer and Pepakura Designer, they basically allow you to take a 3D object, break it up into 2D puzzle pieces that you can print off on some card stock, and then cut and paste together to re-create that original 3D object. AMAZING (and usually pretty accurate)!!

 Now, since I have no idea how to make a 3D model I had to find the file for it online. For the life of me I cannot remember the site I found it on (I spent a loooot of time Googling that one), however credit to roadwarrior for doing the 3D model and nintendude for unfolding it!! After finally discovering and downloading it I excitedly printed it off, spent a few hours cutting it all out and a few more hours gluing it all together again....and that's where I ran into my first problem. The helmet was huuuuuuuuggggeeee! No human head would ever fill that helmet. So, a little discouraged, I went to Youtube searching for some videos on how to scale things in Pepakura.
Unfortunately there doesn't seem to be a magical equation to solve all our scaling problems. The best advice I had (for scaling helmets anyways) is to make it fit the widest part of your head, so the width from ear to ear. After measuring (to the best of my ability) I put that measurement into Pepakura and printed it off again. This time it fit a heck of a lot better, I probably could have even gone a bit smaller but I didn't want to have to print it off and start it all over again for "a bit."

 |
 After the Pepakura process it's time to resin and fiber glass it (another process I was completely unfamiliar with). Since I have never worked with either material before I spent a lot of time on Youtube and in forums looking up how to work with them and any safety precautions related to it....whhhiiiiiiich led me to buy a respirator. It may be about $50 but really, invest in a good respirator if you plan on working with these things!!! Your lungs will thank you.
 SO! After picking up some polyester resin (stiiiinky stuff) and cloth fiberglass from my local hardware store I set to work. The resin comes in two parts: the resin and a catalyst that hardens the resin as it dries. Only make small batches at a time because it goes quick. Following the directions, you mix about a 1/4 cup of resin with a few drops of hardener, give it a quick stir, and take a cheap brush (cuz you won't be getting it back!) and slosh it all over the outside of the card stock. After it had dried I hot glued a piece of foam board on for the fin of the helmet because it was the proper thickness. It ended up making it sturdy enough that i didn't really need to resin it....but I put a thin coat on it anyways. After it all dried I flipped it over, placed cut up squares of the fiberglass cloth on the inside and "glued" it on with more resin. When all that dries it becomes hard as a rock.


Before moving onto the next process you need to cut off any excess resined fiber glass. It's good to have some overhang with your fiberglass as it helps keep your build strong. I borrowed my boyfriends dremel tool and used it to cut off the excess fiberglass around the eye holes, the mouth piece, and the bottom sections and smooth out some of the inside of the helmet. Fiberglass can poke and pierce you if ya just leave it - and no one wants that!


 Next up is Bondo-ing it.You can pick it up at any hardware store or auto body shop. Again, it comes in two parts like the resin. A tub of liquidy clay looking stuff and a small tube of hardener. Before applying, its a good idea to lightly sand the resin on the outside a bit so the Bondo has a better surface to adhere to. After it's mixed up use a piece of cardboard or plastic to spread as thin a coat as you can over the surface of the helmet. This is A LOT harder to do than it looks!! My respect to those who work with this stuff for a living! Once its dry you sand...and there was lots and lots and lots of sanding. Then I did another layer and some more sanding. I would have liked to have put another layer of Bondo on, but was running out of time quickly so decided to do a patch job on the parts that just needed to be evened out most.

After all the sanding I still needed to do some detailing that the Pep file had left out (the lines on the sides and the little bolts around the eye holes). I used an epoxy putty/clay that when activated hardens in a few minutes and while it feels like a rock when dry you can actually sand it down. You can buy this stuff in tubs but the one that was most readily available to me (again, by this point I was running low on time) I got from Canadian Tire called Mighty Putty (as seen on TV!). I rolled it out thin and placed it all around the helmet. For the bolts I just rolled little balls of clay and stuck 'em on - fairly simple.

 Finishing touches! I started with a black primer spray paint as an undercoat and then finished it off with an antique gold. For the lenses I originally thought I was going to use those big clown glasses from the dollar store and just glue them in. But of course, when I need something I can never find it. So I ended up buying those cheesey over sized Elvis glasses (also from the dollar store) and then placed window tint film over top of it. They didn't fit perfectly but it was pretty good for a first try. After that I used a piece of leather from the purse I used for my rocket pack straps to make a chin strap (just hot glue it in).
And that was that. I popped it on and went to the con. Had some great reactions from those who knew the character. Lots of fun and a great learning experience. Can't wait for my next project!


Monday, 23 September 2013
The Rocket Pack


Can't have the Rocketeer without his rocket pack! But first I had to decide if I wanted to go with the look of the comic or the one from the movie....of course the one from the movie is pretty wicked looking - whiiiiich also means a more complicated build. I was already on kind of tight timeline and I had decided to put most of my efforts into making the iconic helmet, so I decided to keep it really simple.
 After some perusing of the interwebs I found THIS Instructable by user ModMischief. It gave me a great starting point for my own. I started the same way: two pop bottles, a mouthwash bottle, some poster board (could have used a cereal box or something similar but I didn't like that it had a crease in it) and cardboard. I cut off the very bottoms of the bottles and wrapped some of the poster board around it to elongate the tube part (hot glue it together!). I made the two cones on the top of the bottles with the poster board as well, just make a circle, cut a line to the center point, pull in and form a cone, glue it together.
 Next, I hot glued a piece of card board between the two bottles and slapped on a couple layers of Mod Podge to seal it so it would paint well. Then I cut the mouthwash bottle in half (height-wise) and cut a circle where the label used to be on the front of the bottle. To make the fan part I glued some toothpicks in to the circle I just cut out, and again, sealed them up with some Mod Podge. Now, the actual fan: I bought a small hand held fan from the dollar store, took it apart, used the cage bit as a cradle to keep it in place (for when I was ready to glue it in), and spray painted the blades of it copper. After that I cut a toilet paper tube in half, cut a whole in it (the width of the neck of the bottle), and used it to cover what was the opening of the bottle so I could use it as a connector piece. Once again, I Mod Podged the TP tube so it'd paint up well, then I put it aside for the time being.


 Heading in to the final few details: I used a piece of thermo-plastic to shape the little bubbles on the side of the rocket pack, used drops of Mod Podge to create little rivets and what not, and found some small-ish yogurt containers to place inside the tube for the rockets. Then I gave everything an undercoat by spray painting it black. After it all dried, I spray painted the mouthwash bottle/TP tube part (without the fan inside!) silver, glued the cage/cradle bit with the fan inside in to the bottle, and then glued the bottle onto the cardboard that is the rockets mid section. I spray painted all but the yogurt containers silver and after it dried placed them back in the tube and glued them in place.

As for the straps, I just picked up a purse with leather handles at a thrift store. Cut off the handles and hot glued them on with a crap ton of glue! Didn't want them going anywhere.


And TA-DA!! Rocket pack complete!

Simple - yet effective.
Saturday, 21 September 2013
My first major cosplay! - The Rocketeer
 The Rocketeer was one of my faaaavourite movies as a kid. I've always felt that he was an underrated character. I loved that he could fly and, just as awesome - the art deco style of his costume (yaaay! 1930s and 40s)! For some reason I got it in my head that this would be a fairly simple build, despite the fact that I have never really constructed any type of helmet before. I've sewn a bit and thrown together simpler costumes with clothes and other items from the thrift store, but not a scratch build.
SO! I did what you should do when starting any new cosplay project - research and reference pictures!!! I re-watched the movie, pulled out my comic books, looked at other peoples costumes, and Googled aloooot. Other helpful sites: YouTube, Cosplay.com, Instructables, Replica Prop Forum again, just a simple search will bring up some great resources.


The Basics
 I bought the pants new for about $20 as I couldn't find a decent fitting pair at my usual thrift stores. The boots were an EXTREMELY lucky find at a Value Village (second hand store in Canada), like, a week or so before the Con. To be perfectly honest I had already bought a pair online that were similar-ish to his but as soon as I saw those ones I HAD to buy them. I'll use the other boots for something else ;)
The jacket was, again, something I hadn't really taken into consideration on how I was going to do it when I decided upon this cosplay. Fortunately, I have a very creative boyfriend (whose also into cosplay) who has a sewing machine. The basic leather jacket was something I found at Value Village. I figured I could keep looking for another leather jacket in the same colour, cut out the back, and make the front flap. But, as the weeks went on, drawing closer to the Con, I didn't think I would ever find another jacket. So we started looking at fabric stores that sell leather or vinyl. We couldn't find anything locally so I searched online only to discover a wonderful website called Discounted Designer Fabrics. You can order FREE samples from them before laying down any money, which is great when you're trying to match a material AND colour. As you can see I found a pretty close match.
So I ordered the fabric, it came in, and my lovely boyfriend made a pattern out of some newspaper and sewed me up a front flap. I bought some snap buttons to use as a means of attaching the flap but the vinyl was too heavy/thick to keep it on the jacket so we ended up putting some velcro on both sides to keep it on.
The gloves I bought new ($6!) at a store that was going out of business and the ignition buttons I made out of some craft foam, pen caps, some Mod Podge to seal, and silver paint.


Next up! The rocket pack.....
Wednesday, 18 September 2013
A Site is Born!
So I've decided to try my hand at blogging. I'm not the most proficient at communicating and when I do I can tend to ramble, so hopefully this will help hone that skill (at least a bit, anyways). As for the theme of my blog, not entirely sure of that either. I figure I'll start and see if I can keep up with it in the first place and just go from there.
In the meantime, enjoy my ramblings!!
In the meantime, enjoy my ramblings!!
Subscribe to:
Posts (Atom)